Dear Fabulous People of the Internet,
Isn’t it a magical world in which we live? We have this amazing tool that lets us find, share, and save some of the most interesting, beautiful, and funny things on the web. Oh, yes I’m talking about Pinterest.
Pinterest is a wondrous place where we all lose track of time. So many tempting sweets, funny images, luscious foods, time and cost-saving tips, inspiring quotes, and OH. . .that crafty haven of beautiful, simple, why-didn’t-I-think-of-that-ideas.
You know what else it is full of? Products that both struggling artists like myself and big companies are trying to promote, get seen, and sell.
When I make an item of jewelry I put my heart and soul, my time, and my precious, hoarded beads into it. And where does it end up? On your “I Can Make That” Pinterest Board. Do you have any idea how that makes me feel? That’s my own original idea and design. Don’t get me wrong, I totally appreciate that you admire what I made, that you want to save it, that you might even want to make something like it. However, please don’t be so blatant about it.
I’ll admit that I personally have other designers’ pieces saved as inspiration on Pinterest. There are a lot of great ideas and interesting use of materials out there. I don't plan on copying those ideas, just using them to spur me forward in my own designs. I also look at pinning their creations as a way to share these unique designs with other people around the world and help the artists advertise the fruits of their labor. When our work ends up on a "Jewelry to Make" board, it cheapens our art and makes us feel like less of an artist. Obviously you can probably make it, or something of a replica of it. But, by placing our art on your “Crafty” board you’ve told the world that our work isn’t worth buying, you can just make it yourself. All I’m asking is that you consider re-naming your Pinterest board “Jewelry Inspirations” or “Designs I Admire” or something along those lines. Think about using your “DIY” board instead as the perfect place to save actual tutorials you’ve found, not an item someone is selling.
Please help us share and promote our hard work, support small businesses, and keep the ideas of what you also want to try. But, be aware that many of us see where you’ve placed those pins of our art. Be tactful about where you rank it. That’s all I’m asking.
Feel free to head over to Etsy, take a look around my CraftyHope shop, and Pin away!
Thank you,
Another Pinterest Fan and Artist

Showing posts with label pinterest. Show all posts
An Open Letter to Pinners from One Artist
I’m a jewelry-artist, treasure hunter, & nature-lover that finds joy in the smallest things. I hope to spread that joy and inspiration.
Pinning with Purpose | Week 6
I'm a bit frustrated right now because my computer won't open PhotoShop so I had to use an online program I'm less familiar with to prepare the photos for this post. I'm hoping the hubby can find a remedy for this issue. If you have any suggestions, please let me know!! On the bright side, it's time for another edition of Pinning with Purpose.
Each week, I pick out a few pins from my Pinterest boards and try to recreate them or use them for inspiration. And, I challenge you to do the same. Find a pin that gets your creative juices going; be it a recipe, style inspiration, or organizational tip and run with it. I encourage you to share your results on your blog and then link it up here.
Before we get into my own pins and results, let me thank the following ladies for linking up this past week.
Over this week, I worked on the following: (Please make sure you pin from the ORIGINAL source and not from here.)
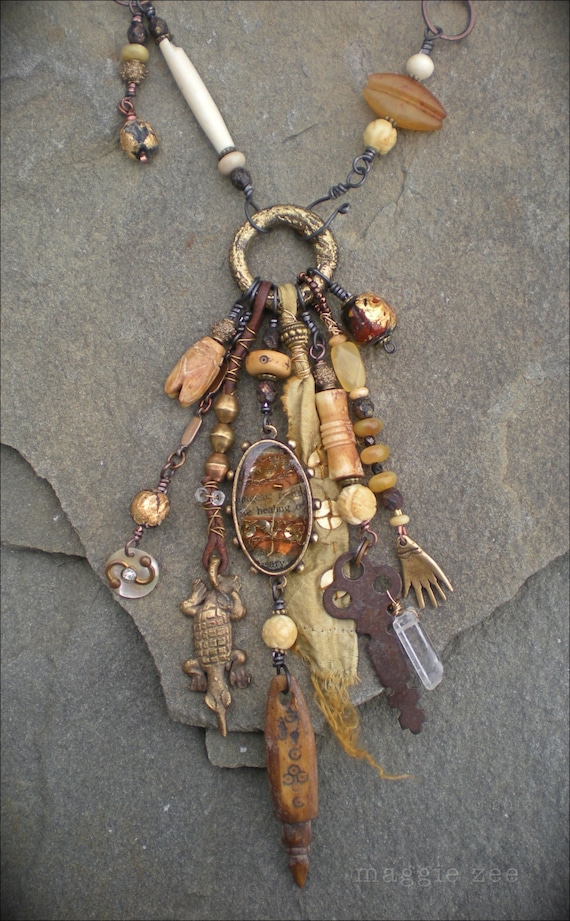
I used these three necklaces from my Jewelry Board as inspiration for my own assemblage piece:
Lastly, I wanted to make an alternative craft supply
Here's how each of these turned out for me.
The Quiche with Hashbrown Crust came together pretty easily. I was able to get all the other ingredients together (including cooking the bacon) while the oven pre-heated and the hashbrown crust cooked.
It was really good too! I might cook the crust just a little bit longer next time as it wasn't as crispy as I would have liked, but I'm pretty sure that's my oven's fault and not the recipe. It was a perfect breakfast for the kickoff to the first weekend of college football.
I've loved the dangly assemblage-style necklaces for a while and have quite a few pinned. It was about time I tackled making a similar one myself. First, I studied the inspirations I had from both Something Sublime and MaggieZee's blog and Etsy Shop. After than, I started by pillaging my stash for a ring-like base.
Once I chose a ring base, I made the pendant from a variety of charms, beads, and other materials.
Last came the chain of the necklace using beads, wire, and a bit of chain.
While inspired by MaggieZee and Deryn, I took my own spin on the style and came up with something I'm really happy with. It's both romantic and funky, just like me.
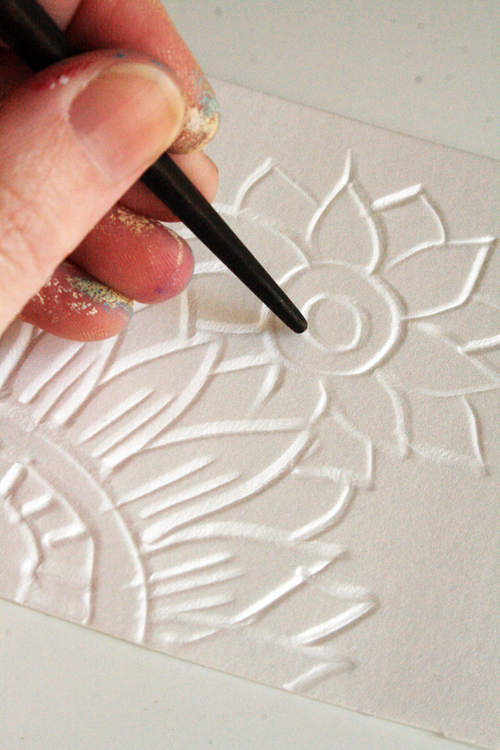
For my last trick, I made stamps on Styrofoam. I drew (poorly) shapes onto some bits of Styrofoam from a take-out container.
I simply painted on some acrylic paints and tested them on scrap paper.
You want to use a nice, even layer of paint and apply even pressure over the whole styrofoam piece if you want a crisp image. This method is perfect for transferring an image in a quick and easy manner. I don't even care if it's a bit sloppy.
Next week is a little crazy, so I'm only going to aim for two pins.
Each week, I pick out a few pins from my Pinterest boards and try to recreate them or use them for inspiration. And, I challenge you to do the same. Find a pin that gets your creative juices going; be it a recipe, style inspiration, or organizational tip and run with it. I encourage you to share your results on your blog and then link it up here.
Before we get into my own pins and results, let me thank the following ladies for linking up this past week.
- Jenna at The Painted Apron with her Hawaiian Chicken Kababs with Smoked Sausage, Peaches, and Apricots.
- Lorraine at We are Clamco for sharing her Scrabble Tile Coasters.
- Lynda of Fresh Baked Designs shared her Cupcake Surprises as well as her Appliqued Tea Towels and Napa Valley Chicken Salad.
Over this week, I worked on the following: (Please make sure you pin from the ORIGINAL source and not from here.)
| Quiche with hashbrown crust from Joyful Homemaking off my Breakfast Board |
| Mementos Narrative Necklace from Something Sublime |
![]() |
| Healing Amulet Necklace from MaggieZees Etsy Shop |
| Chinese Bronze Repro Coin Amulet Necklace also from Maggie Zee |
| Stamps from styrofoam from Alisa Burke off my Good Ideas Board. |
Here's how each of these turned out for me.
The Quiche with Hashbrown Crust came together pretty easily. I was able to get all the other ingredients together (including cooking the bacon) while the oven pre-heated and the hashbrown crust cooked.
It was really good too! I might cook the crust just a little bit longer next time as it wasn't as crispy as I would have liked, but I'm pretty sure that's my oven's fault and not the recipe. It was a perfect breakfast for the kickoff to the first weekend of college football.
I've loved the dangly assemblage-style necklaces for a while and have quite a few pinned. It was about time I tackled making a similar one myself. First, I studied the inspirations I had from both Something Sublime and MaggieZee's blog and Etsy Shop. After than, I started by pillaging my stash for a ring-like base.
Once I chose a ring base, I made the pendant from a variety of charms, beads, and other materials.
Last came the chain of the necklace using beads, wire, and a bit of chain.
While inspired by MaggieZee and Deryn, I took my own spin on the style and came up with something I'm really happy with. It's both romantic and funky, just like me.
For my last trick, I made stamps on Styrofoam. I drew (poorly) shapes onto some bits of Styrofoam from a take-out container.
I simply painted on some acrylic paints and tested them on scrap paper.
You want to use a nice, even layer of paint and apply even pressure over the whole styrofoam piece if you want a crisp image. This method is perfect for transferring an image in a quick and easy manner. I don't even care if it's a bit sloppy.
Next week is a little crazy, so I'm only going to aim for two pins.
- Dark Chocolate Greek Yogurt Fruit Dip from Cook the Story off my Healthy-er Eats board
- Beaded Toggle and Bar Clasp Tutorial from Beading Gem off my Jewelry Tutorials board
Labels:
assemblage,
football,
necklace,
papercraft,
pinning with purpose,
pinterest,
recipe
I’m a jewelry-artist, treasure hunter, & nature-lover that finds joy in the smallest things. I hope to spread that joy and inspiration.
Pinning With Purpose | Volume 2
I hope y'all have had a wonderful, inspired, getting-stuff-done kind of week. I feel like I did. Now it's time for Pinning with Purpose, a chance to use and show off what you did with some of those Pinterest pins you've been saving.
As a reminder, here are the pins I picked to work on this week (please go to the original site if you want to pin these projects also, don't pin from here.)
Here are my results:
The Tiered Pie Tin Organizer: My bathroom counter was absolutely driving me crazy. I'm not one to use many products (seriously), but when I do I want them within reach. However this was out of control.
I collected a few pie plate pieces and some glassware (rather than the candlesticks as suggested in the tutorial) for my organizer.
Some E6000 glued the pieces I wanted to glue quickly and easily enough. Now the right side of my counter looks like this!
It's a breath of fresh air! I still need to do something about the left side as well as the lotion collection. . .I'm thinking a loaf pan would be cool to hold those. What do you think?
General Tso's Tofu: This recipe came together pretty quickly and was so, so good!
Pat raved over it. I'll definitely be making it again.
Rust and Patina: I've been wanting to find a natural way to color metal, something that doesn't seem so toxic. This how-to definitely fit the bill. Here are the metal bits I gathered for this tutorial. I recognize that some of them are already rusty, but I figured it couldn't hurt.
Here's how they came out.
I know it's kinda hard to see a difference (clicking on the pictures should bring up a larger view) so here's a close up of some of the keys where you can see some rusted, some patina-ed, and some didn't do much of anything.
Before rinsing, there was a bit more color on the metals, but I'm glad to know not to trust what the colors are before they are rinsed. Granted, this isn't a super quick method for coloring metals, but it definitely works for batches of items.
I'm really happy with all three of my Pinterest trials this week and am looking forward to trying the following out next week.
As a reminder, here are the pins I picked to work on this week (please go to the original site if you want to pin these projects also, don't pin from here.)
Here are my results:
The Tiered Pie Tin Organizer: My bathroom counter was absolutely driving me crazy. I'm not one to use many products (seriously), but when I do I want them within reach. However this was out of control.
I collected a few pie plate pieces and some glassware (rather than the candlesticks as suggested in the tutorial) for my organizer.
Some E6000 glued the pieces I wanted to glue quickly and easily enough. Now the right side of my counter looks like this!
It's a breath of fresh air! I still need to do something about the left side as well as the lotion collection. . .I'm thinking a loaf pan would be cool to hold those. What do you think?
General Tso's Tofu: This recipe came together pretty quickly and was so, so good!
Pat raved over it. I'll definitely be making it again.
Rust and Patina: I've been wanting to find a natural way to color metal, something that doesn't seem so toxic. This how-to definitely fit the bill. Here are the metal bits I gathered for this tutorial. I recognize that some of them are already rusty, but I figured it couldn't hurt.
Here's how they came out.
I know it's kinda hard to see a difference (clicking on the pictures should bring up a larger view) so here's a close up of some of the keys where you can see some rusted, some patina-ed, and some didn't do much of anything.
Before rinsing, there was a bit more color on the metals, but I'm glad to know not to trust what the colors are before they are rinsed. Granted, this isn't a super quick method for coloring metals, but it definitely works for batches of items.
I'm really happy with all three of my Pinterest trials this week and am looking forward to trying the following out next week.
- All Natural Strawberry Ice Cream Bars from Happiness is Homemade off my Healty-er Eats board.
- Homemade Laundry Soap from Natural and Thrifty (I'll admit, this is a cheat for me because I've made this before and need to make some more in order to wash clothes next week) from my Good Ideas board.
- Button Bobby Pins from Christina Homemaker off my Just Do It . . .Yourself board.
Labels:
altered,
craft,
metal,
organization,
pinning with purpose,
pinterest,
recipe,
recipe review
I’m a jewelry-artist, treasure hunter, & nature-lover that finds joy in the smallest things. I hope to spread that joy and inspiration.
Pinning with Purpose | The Beginning
For far too long I've been haphazardly adding items to my Pinterest boards without a care in the world and without consistently using any of those ideas, tutorials, or inspirations. They've piled up and are embarrassingly out of control. It's about time I get around to putting an end to the Pin-hoarding. As such, I've decided to start up 'Pinning with Purpose.'
Each Sunday I'll pick at least one of my pins to work on during the week and then reveal my results the following week.
And here's how it went:
For the Swatch Portraits, I grabbed some embroidery hoops and fabric I had laying around the craft room and went to town.
In less than an hour I had completed the positioning and gluing. I just had to wait for them to dry.
By the next morning, they were trimmed and on the wall.
I'm pretty smitten with how these look in my hallway.
The One Pot Thai Peanut Pasta wasn't as pretty as the original.
However, it was pretty tasty.
I may even make it again.
The Graphic Bangles gave me the most trouble.
Using the Crystal Clear Shrinky Dinks, they came out a little wonky, but that was possibly my own fault. After all that practice, I made a second attempt with the Shrinky Dinks Frosted Ruff and Ready. Those turned out much better.
They're smaller than the ones in the tutorial, but exactly the size I needed. In fact, one's already been worked into a bracelet. (Somehow I didn't get a picture of it though, but I assure you it exists.)
It's a relief to not have those Pins sitting there, gathering virtual dust. That was fun and I'm ready for more. Here's what I've got planned for next week:
I hope you enjoyed this as I plan to make this a regular thing each Sunday. You are invited to do the same. Explore your own Pinterest boards for those wonderful but neglected ideas and link up here for Pinning with Purpose. Oh, and I'm not SOLD on the name for this yet so if you have suggestions, please let me know!
Each Sunday I'll pick at least one of my pins to work on during the week and then reveal my results the following week.
For this first edition of Pinning with Purpose, I selected the following pins to try:
I'm pretty smitten with how these look in my hallway.
The One Pot Thai Peanut Pasta wasn't as pretty as the original.
However, it was pretty tasty.
I may even make it again.
The Graphic Bangles gave me the most trouble.
Using the Crystal Clear Shrinky Dinks, they came out a little wonky, but that was possibly my own fault. After all that practice, I made a second attempt with the Shrinky Dinks Frosted Ruff and Ready. Those turned out much better.
They're smaller than the ones in the tutorial, but exactly the size I needed. In fact, one's already been worked into a bracelet. (Somehow I didn't get a picture of it though, but I assure you it exists.)
It's a relief to not have those Pins sitting there, gathering virtual dust. That was fun and I'm ready for more. Here's what I've got planned for next week:
- Tiered Pie Tin Organizer from MaryJanes and Galoshes
- General Tso's Tofu from Appetite for China
- Rust and Patina from Treasures from the Heart
I hope you enjoyed this as I plan to make this a regular thing each Sunday. You are invited to do the same. Explore your own Pinterest boards for those wonderful but neglected ideas and link up here for Pinning with Purpose. Oh, and I'm not SOLD on the name for this yet so if you have suggestions, please let me know!
Labels:
decorating,
pinning with purpose,
pinterest,
recipe,
recipe review,
shrink plastic
I’m a jewelry-artist, treasure hunter, & nature-lover that finds joy in the smallest things. I hope to spread that joy and inspiration.
Subscribe to:
Posts (Atom)
NEW website (and blog to go with it)
Hey y'all!! I've got some news. It's great, but also bittersweet. After almost NINETEEN years here on Blogger/Blogspot, I'v...
-
Learning to make jewelry is as simple as knowing a few of the tools and how to perform several techniques. From there, a whole world of des...
-
I have a confession to make - I love buttons! Okay, that's pretty well known. I've been collecting them for years and years and hav...