Showing posts with label art beads. Show all posts

Bead Box 6 - Stocked


I'm not one who can sit idle for long. I've always got a project. If you ask me what I'm doing, I always have an answer. It's hardly ever, "Nothing." I'm not sure what took me so long to come with the idea for my "Bead Box", but the idea has stuck. It's just a plastic, divided organizer in which I place the components for several designs. When I travel or am just away from home for several hours, I have it with me so I can create. This is the sixth incarnation of this box. Let me share what I've packed into it, and when it's all done, I'll show you what came out of it.
The first and largest compartment holds this big, rectangular chandelier crystal and an array of clear, white, and silver beads that will be used to make a chain to create a long necklace.

I took a little time while packing this bead box to alter some tin: dimples were added a couple of blue and white discs. Blue and white beads will also be added to hang from the discs to make a pair of earrings.

First off, yes, I arranged these pieces to look like a face. It tickled me. The stacks of tin discs (some domed) and the chain will be combined into earrings. 

More tin!! I dimpled these discs as well, then sanded and hammered them flat. They resemble moon craters. There's not much color in the tin, so I picked out bright orange glass beads and large turquoise chips to go with some wood and copper bits. They're also destined to be earrings.

I've been hanging onto this adorable octopus pendant for too long. It's time for him to meet his destiny. I decided to choose waterlike beads to compliment him. So, his chain will be made from blue and white beads. I also threw in a few brass beads to compliment his own coloring.

These two pieces of tin were combined some time ago, but it's taken me ages to decide what to do with it. To make it the star of a necklace, I picked out small brass beads and Czech glass beads with a peach tone that will make up a simple chain.

Here's another pendant that I've hung onto for forever! (Do you see a theme?) I decided to add a pop to it with an array of brightly-colored beads for its chain.

Textured tin, alcohol inks, tube rivets, and an old belt were used (a while back) to make this pendant. It's been lingering in my stash with so many of the other pieces that made up this box. A Tim Holtz charm was altered with Vintaj Patinas to match and pair with the pendant. A few beads in corresponding colors will be added to some silver chain to finish the necklace.

When Jade Scott was still making these fabulous resin pieces, I was only able to snatch up a few. It's been hard to figure out how best to showcase them. For this little mushroom, I'm pairing it with a vintage button to make up the whole focal. Then, vintage red glass bead caps, white flower beads, and copper beads will be worked into a chain somehow. We'll see how it comes together.

After that brain teaser, I'll need something simple. The assembled key and rhinestone element will be paired with a chain of clear crystals for a beauty of a necklace.

This small riveted tin pendant is paired with an array of colorful beads and brass beads. And, for the life of me, I can't remember if it's supposed to be a necklace or bracelet. I guess I'll figure that out when I get to it. HA!

This button selection had been in my last bead box, but I didn't realize what they were for. Oops! Instead, I'm going to work them into a necklace with that gold pendant and faceted gold beads.

Earrings. This selection of handmade, lampworked beads and silver-tone elements will definitely become earrings.

A friend gifted me with that rhinestone piece AGES ago. I've been puzzling over what to do with it ever since. I think I finally have an idea. It will be combined with beading wire, blue and clear beads, and silver spacers to create a unique necklace.

Here are some simple elements to make a simple bracelet. I hope it comes together as easily as I have envisioned.

While I was pulling out the cultured sea glass beads for the previous project, I grabbed these two lighter-shade beads that are hopefully going to make some super fun earrings with those bright beads and cute bead caps.

And, here's the bead box in its entirety. 
I sort most of the pieces into plastic baggies before I put them in the box to try and make sure all the pieces stay together and don't wander into other compartments and confuse me.

If you're interested in seeing my previous bead boxes, here are the links to those entries. 


What do you think? Are these too...all over the place?
Do you do something similar to keep you busy?

My Partner and Beads for the Bead Peeps Swap N Hop 2018

For the second time, I'm participating in the Bead Peeps Swap N Hop. It's a fun swap between jewelry-makers through the Bead Peeps Facebook Group. Each designer is paired with another to swap pendants, clasps, and beads ensuring that at least one item is artisan made. Then, we make something with the loot. I'm paired with the amazing Kathy Lindermer.

I'm so very bad at introductions, especially compared to the one Kathy wrote about me. Let me at least try to get you acquainted with her. Kathy is an accomplished jewelry artist and blogger who blogs under the name BayMoonDesign (isn't that lovely!?). You can also find her selling her designs under Bay Moon Design on Etsy. Not only does Kathy create wonderfully romantic and nature-inspired pieces of jewelry but also fun and quirky cards.
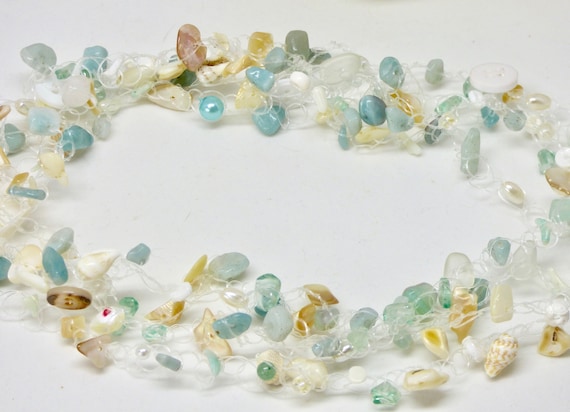
Ocean Shell Necklace from Bay Moon Design on Etsy
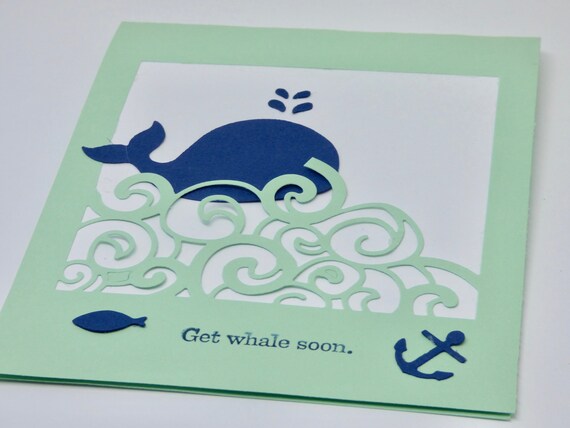
Get Whale Soon card from Bay Moon Design on Etsy

Kathy gets to live the best of both worlds as she spends mild summers along the Delaware coastline and warm winters in the Florida Keys. Lucky her!! Kathy's designs have a feeling all their own. Somehow she is able to incorporate elegance, rusticness, and romance into each of her pieces. And, it works beautifully!
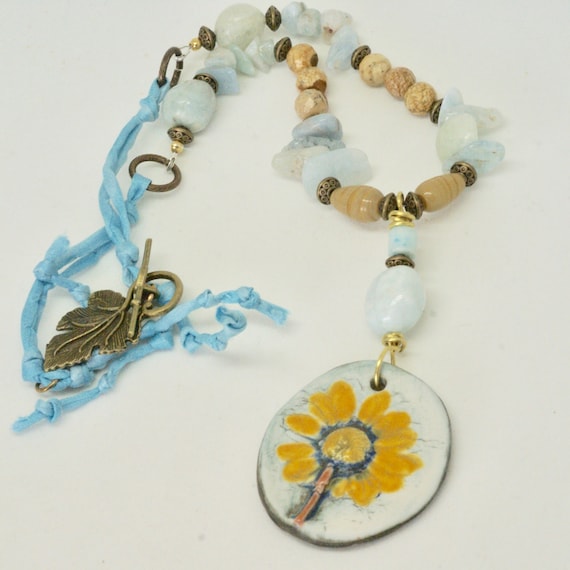
Yellow Floral Pendant Necklace from Bay Moon Design on Etsy
While Kathy and I have never met in person, I feel like we've known each other for ages through blogging and beading. And, I can tell just from what she sent me for the Bead Peeps Swap N Hop that she's a VERY generous person!

It started with this unassuming box! (Well, unassuming except for the fact that Kathy totally picked up on my love of kitties!)
What she wrote in the card hinted at a color palette option. What!?

When I finally got the box open, the eye candy that awaited me was magical! (yes, magical eye candy...I said it!)
Obviously, the peacock feather immediately stood out and captured my attention for at least several seconds. Then I began to dig!

Kathy was able to pack that little box tight with all these treasures!
And, now that they're all out, you can see what she meant about the color palettes. On the left are the ultraviolet (Pantone's color of the year) selections and on the right are her "earthy" selections. I could tell right away which beads were in which palette. Yet, I grouped the copper clasp with the ultraviolet pieces while Kathy took her picture with the rustic ones. We'll see what I end up doing with it.

Let me give you a little more detail about what she sent. At the center, there is a ceramic pendant from Marsha Neal Studio. In the 12 o'clock position is a strand of purple shell beads (look at those SPIRALS).  At 1 o'clock is a polymer clay bead from Humblebeads.  In the 3 o'clock position are luscious Czech glass beads. At 4-5 o'clock is Wooly Wire! (My swap partner last year also sent me some, if you remember, and I never got around to using it. Maybe this time I will!). At 7 o'clock is a lovely spiraled copper hook clasp made my Kathy herself (a woman of many talents!). At 9 o'clock are ceramic beads with stone beads above them.

And then there's a WHOLE OTHER SET!
Again, starting in the center is that fabulous peacock feather pendant from Firefly Design Studio. At the top are green-dyed fire agate beads. Jasper beads are on the right. Polymer clay twisted beads at the bottom. (These are marked as by Jera Luna, but I'm not familiar with this artist so if you have a link to them, please share!!) At the left are natural wood beads.

There is no way I couldn't be inspired by this mix of awesome. I've already got a few ideas that I will set into motion soon. But for now, a teaser of what I sent Kathy!
Kathy should be getting the package in the next day or two so that should be enough to keep you (and her) guessing.

I'll share non-blurred pictures when I'm sure she's received it. Until then, I hope she likes it, and I'd better get to work on my own. Come back March 26th for the full reveal!

Paper and Art Charm Ornament (for ABS Ornament Hop)

It's handmade ornament hopping time!! At least, it's the first of the two hops I'm hoping to participate in. Today is the reveal for Art Bead Scene's 7th Annual Ornament Hop. Since it's a hop, I'm sure there are plenty of other blogs to get to, so let me keep this as short as possible.

Here's the ornament I made!

When I shared the Inspiring DIY Ornaments, the Paper Christmas Ornaments from Dream a Little Bigger sparked my imagination.  You see, I've got a deep love for paper, dictionary paper especially. So, I knew I could make the process my own with that addition. To add in the art bead element, I remembered putting a fabulous cardinal polymer clay charm into my Inspiration Jar. The pendant is made by Erin Prais-Hintz of Tesori Trovati.

I had received the charm from my partner, Kari Asbury for the Bead Peeps Swap-n-Hop but couldn't come with a design for it at the time. I think it was destined to become this ornament.


There's just something about the red bird that sings Christmas to me. I'm not sure what it is, but I knew I needed to use that element in particular. While I do love the dictionary paper, I almost wish I had used sheet music instead. I may change that later, but for now, I'm quite happy with how this turned out. 

I simply added red and green wonder beads for a touch of magical shine, and my ornament was complete. Well, there was a bit more than that to it. I actually made a short video of how to create this Paper and Art Charm Ornament if you're interested in the process. 

It really was a quick and easy process to make the ornament, and I had everything I needed on hand. You could easily personalize this even more: different paper, more elaborate beads, adding glitter, including your own art charm, etc. There are so many possibilities!

So, that's my contribution to the Art Bead Scene Ornament Hop. Get on hopping and see what everyone else made!

UPDATE! I went a little nuts and paper punched some old Christmas cards to make a variation on this ornament.
The Christmas cards were sturdy enough that I didn't have to add the cardstock backer. As well, instead of the art charm, I used a red jingle bell (from the Dollar Tree).

They worked out great as an accent on a bunch of little gifts I had to wrap up.
Pretty right?

I'm also linking this post up on Saturday Sharefest at The Sway, Show and Share at Coastal CharmDIY Salvaged Junk Projects at Funky Junk Interiors, and Saturday Sparks Link Party at Pieced Pastimes

Bead Peeps Swap N Hop - The Exchange

Almost a month ago I mentioned that I'm participating in the Bead Peeps Swap N Hop. Bead Peeps is a Facebook group hosted by Linda Anderson of Cherry on Top Designs. My partner (Kari Asbury) and I both just received our beads so I'm ready to show off both sets. Let's start with what she sent me.
Check out that variety!! Okay, okay. I know that's not the best picture. Better ones are below!

Kari sent me a wonderful mix of beads and artisan components.
First, these was a baggie of gorgeous mixed glass beads.

A couple of beads and a button from Gaea. Drool!

These pretties from Nan Emmet of Spirited Earth.

Some luscious dyed sari ribbon.

A lovely little pendant from Erin Prais-Hintz of Tesori Trovati

A bit of WoolyWire (which I've always wanted to try!)

And, finally my favorite pieces - the ones Kari made herself!! Look at that KEY!

Here's the whole group again.
I'm itching to get started with these goodies, but can't even decide where to start. She spoiled me so. THANK YOU Kari for an amazing set.

Oh, and here's what I sent her.
The main, artisan component is the altered crown from Dry Gulch Beads. The rest of the goodies were either from my stash or bought new from a local bead store. I explained to Kari that I went with the crown because Mardi Gras was going on while I collected these bits for her. I'm from (and now live across the bay from) Mobile, AL - the original home of Mardi Gras in the US. So, a crown felt fitting. As well, I'm also on the Gulf Coast so the blue-greens also felt right to represent my area.

In laying out the swap, Linda suggested that we keep a duplicate of the beads we send in order to play along with our partners. I did just that. So, I have two challenges ahead of me. I'm looking forward to them both. Make sure to follow Kari on her Instagram as KariAsburyJewelry as well as on her Kari Asbury blog to see what she has to say about the swap. And, make sure to stay tuned for the reveal on April 8th.

Reveal of My Shipwreck Dandy Destash Box (picture heavy)

Richelle of the Shipwreck Dandy blog has two etsy shops. In one she sells her beautiful handmade rustic assemblage jewelry and in the other she sells handmade, vintage, and select jewelry supplies. She's currently going through a 'studio excavation' and making up destash boxes for what she unearths. I totally jumped on this deal because I just love her style.

She'll even take into consideration your preferences if possible. So, I told her that I would like a little bit of everything including some of the metal bits she had shared in one of her pictures, but that I also love of buttons, findings, beads, etc. After she received this notification, she asked if I had any more requests. I basically said that anything that feels rustic and old or romantic would be awesome. Here's what I received.
The inside of the box
The loose bits on the top of the package
My favorites of the loose bits: bone beads, buttons, and chain
Then, there were all these packages
and still more under the wrapped packages
I started with the smallest of the packages and discovered some of Richelle's handmade pieces. YAY!
The rest of the packages are below, first how they look piled up in the protective wrapping she used, and then all laid out for a better view.
Bundle 1
Bundle 1 on display
Bundle 2
Bundle 2 on display
Bundle 3
Bundle 3 on display
Bundle 4
Bundle 4 on display
Bundle 5
Bundle 5 on display
Bundle 6
Bundle 6 on display
Here's those little bits I found at the bottom
I couldn't wait to go through each and every piece in the box, so I sat down with an empty organizer and filled it right up!

Thank you Richelle for your generosity. I really think this was a steal for $20 plus shipping. Make sure to get your own totally stuffed destash box before her excavation ends!


NEW website (and blog to go with it)

 Hey y'all!! I've got some news. It's great, but also bittersweet. After almost NINETEEN years here on Blogger/Blogspot, I'v...