Showing posts with label blog hop. Show all posts

The Eyes Have It (AE Reveal)

Happy Halloween!
And, if that isn't fun enough, it's also reveal day for the Art Elements theme hop for October. This month, Laney selected Eyes as the inspiration. I was late in signing up, though I spent chunks of time throughout the month thinking about the theme. 

Initially, I played around in my art journal, drawing faces. But, after I got my bead loom and became obsessed with it, I decided to try to create an eye with it. 
The idea came to me as I was waking up one morning and I couldn't wait to get to the bead store to buy some beads. I've never been one to work much with seed beads and all the ones I had were the cheap, irregular ones. And, I've found that I like the large 6/0 and 8/0 beads on the loom. So, out I dashed to the bead store.

Using the seed beads, hemp cord, and Wildfire; this bracelet came together pretty quickly on the loom. To finish it, I simply tied some knots and added a button for a closure.

I'm absolutely still learning how best to work with the loom, so if you have any tips, tricks, tutorials, or any other advice; please don't hesitate to let me know!

Once my first eye was made, I could relax a little about the challenge. I remembered that at the beginning of the month, after the challenge was issued, I had saved a link from My Modern Met on How to Draw Eyes. (I thought it was rather fateful that the challenge and this tutorial fell in the same month.) So, I made a quick attempt.
It's not great, but the tutorial really did have some good tips for working on my drawing skills.

Though I had already completed one entire project for this reveal, I couldn't get the idea of it being Halloween-time and needing something "spooky" for the reveal. And, that's when the image of the Eye of Sauron from The Lord of the Rings popped into my head. Seriously y'all. Any good geek knows how scary that eye is - perfect for Halloween. 
Again, the design for this piece was something that came to me as I was waking. At first, I thought I wanted to do it in an organized bead loom-type way with lines of wire separating all the beads. However, as I drew out the design, I realized that it wouldn't work since I needed so many beads to get the image just right. 

Instead, I created a frame with 14 gauge copper wire and strung beads between it. It was fiddly from start to finish, but I kept reminding myself that it would never come together if I just gave up. So, I persisted and am quite pleased with how it turned out in the end.
Perfectly spooky for Halloween!

Once that trial had ended, I wanted to go ahead and play with the idea of eyes in my art journal. As I pondered whether to try drawing more eyes or not, I remembered this envelope of eyes.
Seriously. I have had that envelope for probably 15 years or more, back from my Decoupage days - a seriously LONG time ago. So long, you can see that the envelope has begun to yellow. 

And, yes, it's filled with eyes.
I've long had an affinity for the "windows to the soul" and went through a magazine-clipping phase for a while. So, I had plenty of eyes from which to choose. 

I selected a pair that fit nicely in the journal I selected. It's an old Bobbsey Twins book.

From there, I just played with my art supplies until I was happy with the page.

It wasn't until I was selecting a sentiment for the page that I began to ponder the importance of eyes in our creativity. We often use visual words like: See, View, Envision, Visualize, Watch, etc that have everything to do with how we take in the world around us and how we creatives want/need to add to it. The eyes are such an integral part of that.

Alright, enough with the deep thoughts, I do hope you've enjoyed seeing what I created. Don't forget that this is a Blog Hop of artists. Make sure to head over and check out what the other creatives made with the Eye theme from Art Elements. Much thanks to Laney for the inspiration!

AE Team: SusanMarsha , ClaireCathyJennyNikyJenniferLaney
Guests: DawnHopeBeth & EvieKathyMichelleTammyCatElaine
Oh, and one more snippet of fun eye-inspiration I found this month. These Creepy Book Eyes are slightly spooky and totally fun! Have a fantastic Halloween!!

Bead Peeps Swap-n-Hop Reveal

The day has finally come! It's time to reveal what I created with the goodies from my partner, Kathy of Bay Moon Design. First, let me remind you what the challenge was. This blog hop is for members of the Bead Peeps Facebook Group. Those interested are assigned a partner. Each person sends his/her partner at least one artisan component - be it a bead, focal, or clasp; and at least one other of the component types that correspond to the artist-made piece. (Though, most everyone sends way more than that!) Then, we create! Our creations must include the art piece. Well, let's get to it!

Here's a reminder of the beauties that Kathy sent me.
You may recall that she gifted me with two whole palettes with which to work. So much yumminess. Her note said that she couldn't wait to see which one I picked - I picked both!

My gut reaction drew me to the ultraviolet palette first with the focal from Marsh Neal Studio. Kathy also included Wooley Wire which I was itching to use, especially since I didn't use the bit I received from my partner, Kari, in last year's swap. Additionally, I was drawn to the beautiful copper clasp handmade by Kathy herself. In Kathy's pictures, she included the clasp with the other palette, but I was compelled to use it with the ultraviolet pieces. Here's what I came up with.
It's really a simple necklace with a bit of a spiral-theme. With the spiral-ish shape already in the focal, I created another at the center with the Wooley Wire to make a bail for the donut-shape. Copper coin beads with spirals on them that just happened to be in my stash continued the theme. I also used two of the large violet beads Kathy sent. (My original post called them ceramic, but they seem to be glass.) The majority of the chain is made of alternating 4mm violet and copper beads that are wire wrapped to one another on antiqued 22 gauge copper wire. The necklace closes with Kathy's hook clasp that also happens to have a spiral on it. 

I have to admit that I have a thing for spirals. Oh, and the focal still turns in the bail I created so it's a bit of a fidget necklace. Fun, right?

Now for the not-so-fun part.

Next, I turned to the beautiful peacock feather from Firefly Design Studio. Before I reveal any pictures though, I have to reveal the disaster that occurred. After completing my pieces, I placed them in a bowl on the side of my desk so I could easily transport them to the window to take pictures. Before I could get the pictures taken, the bowl was knocked to the tile floor in my craft room. That amazing focal broke into four pieces. I was heartbroken. I'm still heartbroken. However, I wanted to reveal what had been and attempted to glue those four pieces together to re-assemble the necklace. Here it is in its post-disaster state. I'm SO SORRY!
I ended up not using any of the coordinating beads Kathy sent. Instead, I found green faceted glass beads and mustard yellow stones that matched the eye of the feather perfectly. And, the Czech glass flowers I unearthed also have all the same shades as the focal (if you look close). Gold accents were added. I used the beads sparingly, wanting the feather to be the centerpiece, and completed the necklace with gold tone chain.

The Czech flowers are hanging from chain that's attached to the jump ring for a simple accent. Can you see the cracks?

I could cry all over again. Sometimes I'm far too clumsy for my own good. I guess this necklace is mine now though. So, that's a bright side at least.

After completing the two necklaces, I still had loads of beads. And, the gorgeous purple beads with the gold luster were simply begging to be used.
I paired them with green fire agate barrel beads (from Kathy) and yellow Chinese crystals (ZnetShows.com from my stash). As well, I used gunmetal flower accents. I love that I was able to incorporate both of the palettes Kathy sent into these earrings. And, they're so perfect for Spring. 

There were difficulties in getting them just as I had envisioned. But, after several tries, I was able to wrap the ends of the headpins in a spiral on the backs to ensure that they stay tight on the petals. After that, they were perfect!

I have plans with some of the other beads that Kathy sent. Though, even with the extended deadline, I just couldn't get to them. I'm excited to see what Kathy does with the beads I sent her. Here's a reminder.

Don't forget that this is a blog hop and there are loads more links to click and inspiration to be found. You can find the full list below. 

Linda Anderson  (Hostess)
 YOU'RE HERE >>>> Hope Smitherman 

Seed Beaders


Enjoy the hop!

Paper and Art Charm Ornament (for ABS Ornament Hop)

It's handmade ornament hopping time!! At least, it's the first of the two hops I'm hoping to participate in. Today is the reveal for Art Bead Scene's 7th Annual Ornament Hop. Since it's a hop, I'm sure there are plenty of other blogs to get to, so let me keep this as short as possible.

Here's the ornament I made!

When I shared the Inspiring DIY Ornaments, the Paper Christmas Ornaments from Dream a Little Bigger sparked my imagination.  You see, I've got a deep love for paper, dictionary paper especially. So, I knew I could make the process my own with that addition. To add in the art bead element, I remembered putting a fabulous cardinal polymer clay charm into my Inspiration Jar. The pendant is made by Erin Prais-Hintz of Tesori Trovati.

I had received the charm from my partner, Kari Asbury for the Bead Peeps Swap-n-Hop but couldn't come with a design for it at the time. I think it was destined to become this ornament.


There's just something about the red bird that sings Christmas to me. I'm not sure what it is, but I knew I needed to use that element in particular. While I do love the dictionary paper, I almost wish I had used sheet music instead. I may change that later, but for now, I'm quite happy with how this turned out. 

I simply added red and green wonder beads for a touch of magical shine, and my ornament was complete. Well, there was a bit more than that to it. I actually made a short video of how to create this Paper and Art Charm Ornament if you're interested in the process. 

It really was a quick and easy process to make the ornament, and I had everything I needed on hand. You could easily personalize this even more: different paper, more elaborate beads, adding glitter, including your own art charm, etc. There are so many possibilities!

So, that's my contribution to the Art Bead Scene Ornament Hop. Get on hopping and see what everyone else made!

UPDATE! I went a little nuts and paper punched some old Christmas cards to make a variation on this ornament.
The Christmas cards were sturdy enough that I didn't have to add the cardstock backer. As well, instead of the art charm, I used a red jingle bell (from the Dollar Tree).

They worked out great as an accent on a bunch of little gifts I had to wrap up.
Pretty right?

I'm also linking this post up on Saturday Sharefest at The Sway, Show and Share at Coastal CharmDIY Salvaged Junk Projects at Funky Junk Interiors, and Saturday Sparks Link Party at Pieced Pastimes

(Un)Finished Objects (UFO) Blog Hop 2

Karen Williams of Baublicious is hosting this UFO (UnFinished Object) Blog Hop. The point of the hop is to dig out some of those unfinished items (we all have them) stashed away and actually completed them. This is her second of these hops this year.

I mentioned this hop when I shared some of the challenges ahead of me. I even showed some of the hidden UFOs I was contemplating working on. Now, it's reveal day.

As admitted previously, I had several lengths of completed kumihimo that needed to turn into actual jewelry.

I took a little time and one became a FINISHED bracelet!
There wasn't much to this except to get the bead caps on the ends, add a clasp, and attach some chain to extend it a little. BAM! Done. Maybe I'll get to the rest before another 5 years passes me by.

In addition, this collection of items I had been toting around was transformed.

Instead of a jumble of bead supplies, it became an actual necklace. How about that?
One whole side of the chain was completed. I just had to copy it for the other side then connect everything with jump rings. I don't know why I stalled out on this one.

As well, I had these bits and pieces assembled in a baggie.

The completion of it took a little longer as I had very little of the Vintaj Arte metal wire and something about the whole thing felt off. I finally decided it was the two gauges of wire. I had used 20g on the tarnished beads because of their large holes and 24g on the buttons because of the amount of wrapping that was involved. While that seemed perfectly reasonable, the result left something to be desired. Instead, I started anew with 22g hematite wire and replaced the tarnished beads with some metallic-looking e beads for a more cohesive result. As well, I only used that for the front section of the necklace and created the back with the e beads and gunmetal eye pins.
It looks lovely now!

Finally, I had a set of earrings on my desk that simply needed ear wires. I can't fathom what took me so long to slip those on them.
I'll add these to my growing pile of earrings from The 100 Day Project. But, since I didn't MAKE them as part of it, I won't be counting them.

Oh, make sure to head over and enter my earring giveaway. That is, after you've checked out the rest of the UFO participants.

Karen Williams, Baublicious
Francie Broadie,  FAB
Christine Van Dyke Altmiller, One Kiss Creations
Kim Dworak, CianciBlue
Liz Hart, Treetop Life
Amy Severino, Amy Beads
Cynthia Machata, Antiquity Travelers
You are here --->>> Hope Smitherman, Crafty Hope
Christi Carter, Sweetpea Path
Bobbie Rafferty, Beadsong Jewelry
Margo Lynn Hablutzel, My World and It's Full of Books


I can't wait to see what everyone else was able to accomplish. And, it's such a relief to have a few of my own projects completed at last.  Thanks to Karen for the opportunity to be a part of the hop and actually finish a few things!!

August Challenge from Wonder and Whimsy - my reveal

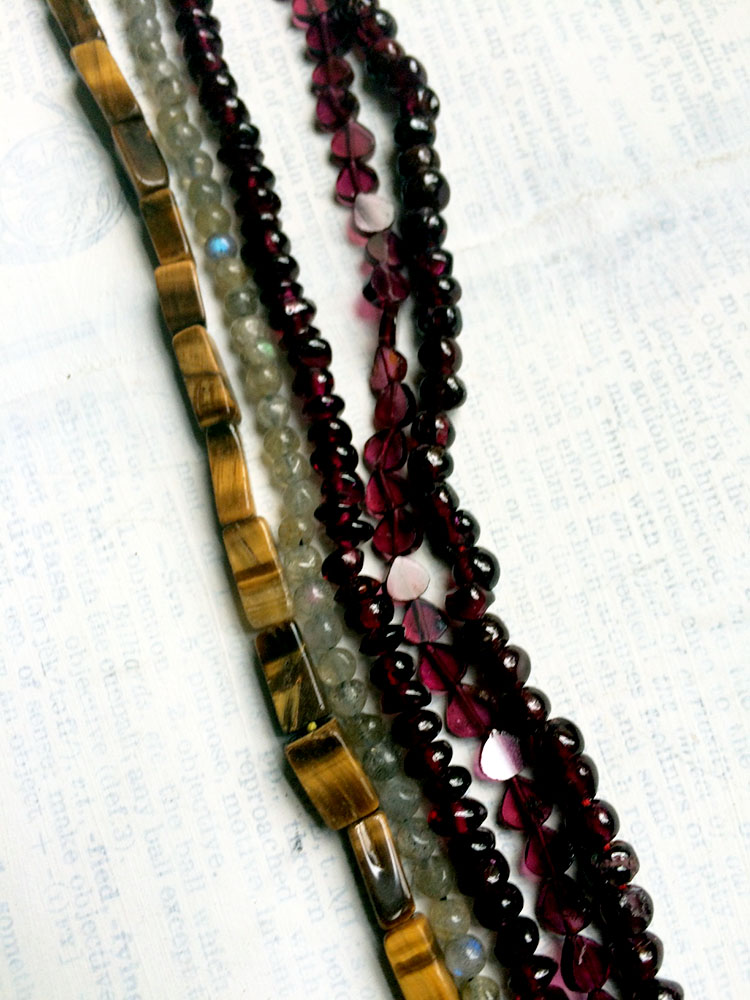
A few weeks back, Jenny from Wonder and Whimsy posted that Fire Mountain Gems was having a super sale on randomly selected bead strand mixes, basically grab bags of bead strands. I was just barely able to order before time ran out on the sale. I went for two 5-strand mixes and one 3-strand mix of gemstones. I loved the anticipation of the surprise beads.
My stone-identification-ability is quite rusty as of late, but let's see... The first mixed set I opened included a strand of square tube tiger eye beads, small round labradorite beads, and three strands of what I think is garnet.

The second 5-strand set was somewhat similar to the first with two strands of tiger eye, two strands of garnet, and a strand of labradorite.

Finally, the 3-strand mix left me a little baffled. I'm pretty sure the middle strand is rose quartz but just can't figure out the other two. I think the left one MAY be a yellow agate of some sort but am not sure. And, I have no idea about the one on the right. Let me know if you have any ideas what they are.

While I may not have been able to identify all the beads I received, I'm smitten with the mix of them.
Beauties just as they are!

However, the challenge that Jenny set out was to create something with the random mix. Even if you didn't order one of these sets, she put forth the challenge to use some of your own random beads.

I started by pairing the tiger eye and yellow agate(?) with gold tone beads and black cultured sea glass beads.

This bracelet came together pretty quickly.

What to make next was a harder decision. There were still so many beautiful gemstones in the mix.

As you can tell from the above photo, I decided to use a skeleton key as the focal.

Alas, I haven't finished the necklace, but you can kinda see the direction I'm headed.
It's going to be a fairly long necklace so I've still got a bit of work to do.

Thanks so much to Jenny for the heads up about the great sale and for issuing a fun challenge. Jump over to her blog, Wonder and Whimsy, to see what she received from Fire Mountain, what she made, and what else she has up her sleeve.

Whoops Blog Hop

For the last issue of ZnetShows' Creative Spark magazine, Cynthia Machata (Of Antiquity Travelers) picked out some beautiful gray pearls from ZnetShows' huge Glass Pearl selection. (Huge is a key word here. . .) Cynthia openly admits that she has trouble with measurements so when the 16mm pearls arrived and were so large, she was surprised. Whoops!
After creating her design for the magazine, Cynthia realized that she was challenged by the size and would likely not use up both strands of the beads on her own. Instead of just shelving the beads, she e-mailed several bead bloggy friends and asked if they would be interested in working with her "Whoops" beads. I was included in that list. I'll admit that the size of the beads and my limited time had me hesitant to join the challenge. However since I do love a good challenge, I decided to play along.

The beads are definitely larger than what I'm used to working with too, but that didn't stop me from coming up with design ideas. Actually, I had my own "Whoops" as I initially envisioned using one of these big, beautiful beads as the focal for a statement ring. It definitely would have been gorgeous too, if I had ANY skill at making rings with wire. Alas, it didn't turn out at all as I had envisioned and was soon cut apart for my next idea.

In working toward my next design idea, I was happy to discover that I had a stockpile of 4mm pearls in the same gray color and some 6mm glass pearls in dark gray, both from ZnetShows.com. I planned to pair the pearls with silvertone chain. However, while picking out the silvertone chain, I was drawn to a length of gunmetal chain and couldn't resist taking it home too. Once home, it was obvious that the gunmetal chain was the way to go. Vintaj 24g Arte Metal wire was then used to connect the pearls to each other and the chain. Here are my results.
I used all the pearls from Cynthia in this necklace. I know it's also a little simple for my usual style. While I wanted to incorporate something a little more.  . . upcycled  (like the pieces Christine sent me), these pearls really make their own statement so I left them alone.

I'm glad that I jumped on board with this challenge because the end product turned out so beautifully. I'm anxious to see what the other participants did with their large pearls. You can check it out too by following these links.

Thank you Cynthia for including me. It was that perfect balance of a challenge and inspiration.
I hope all of you like what I made, but would love to hear what you think either way.

NEW website (and blog to go with it)

 Hey y'all!! I've got some news. It's great, but also bittersweet. After almost NINETEEN years here on Blogger/Blogspot, I'v...