Chain Link Earrings: Part 10

Today, we finish up the DIY Chain Link Earring series with one final tutorial that shows you how you can transform a large link of chain into an earring. 


In this tutorial, I'll walk you through adding and wrapping a button with a loop onto the link and then creating a series of bead dangles to hang from the bottom. 

While these are fairly simple techniques, this is ranked as the hardest of the tutorials because adding the button and then the loop can be a bit fiddly. You can watch Chain Link Earrings: Part 10 to get the tutorial. 

If you missed any of the other videos in this series, you can find the whole Chain Link Earring Playlist on YouTube. 

As always, don't hesitate to let me know if you have any questions about the techniques I used or really anything else. I'm always more than delighted to help. 

CraftyHope on Etsy (and 20% off Coupon Code)

 It's been quite a few months since I shared what's available over in the CraftyHope Etsy Shop. So. let me give you a little look at some of the beauties you'll discover there. 

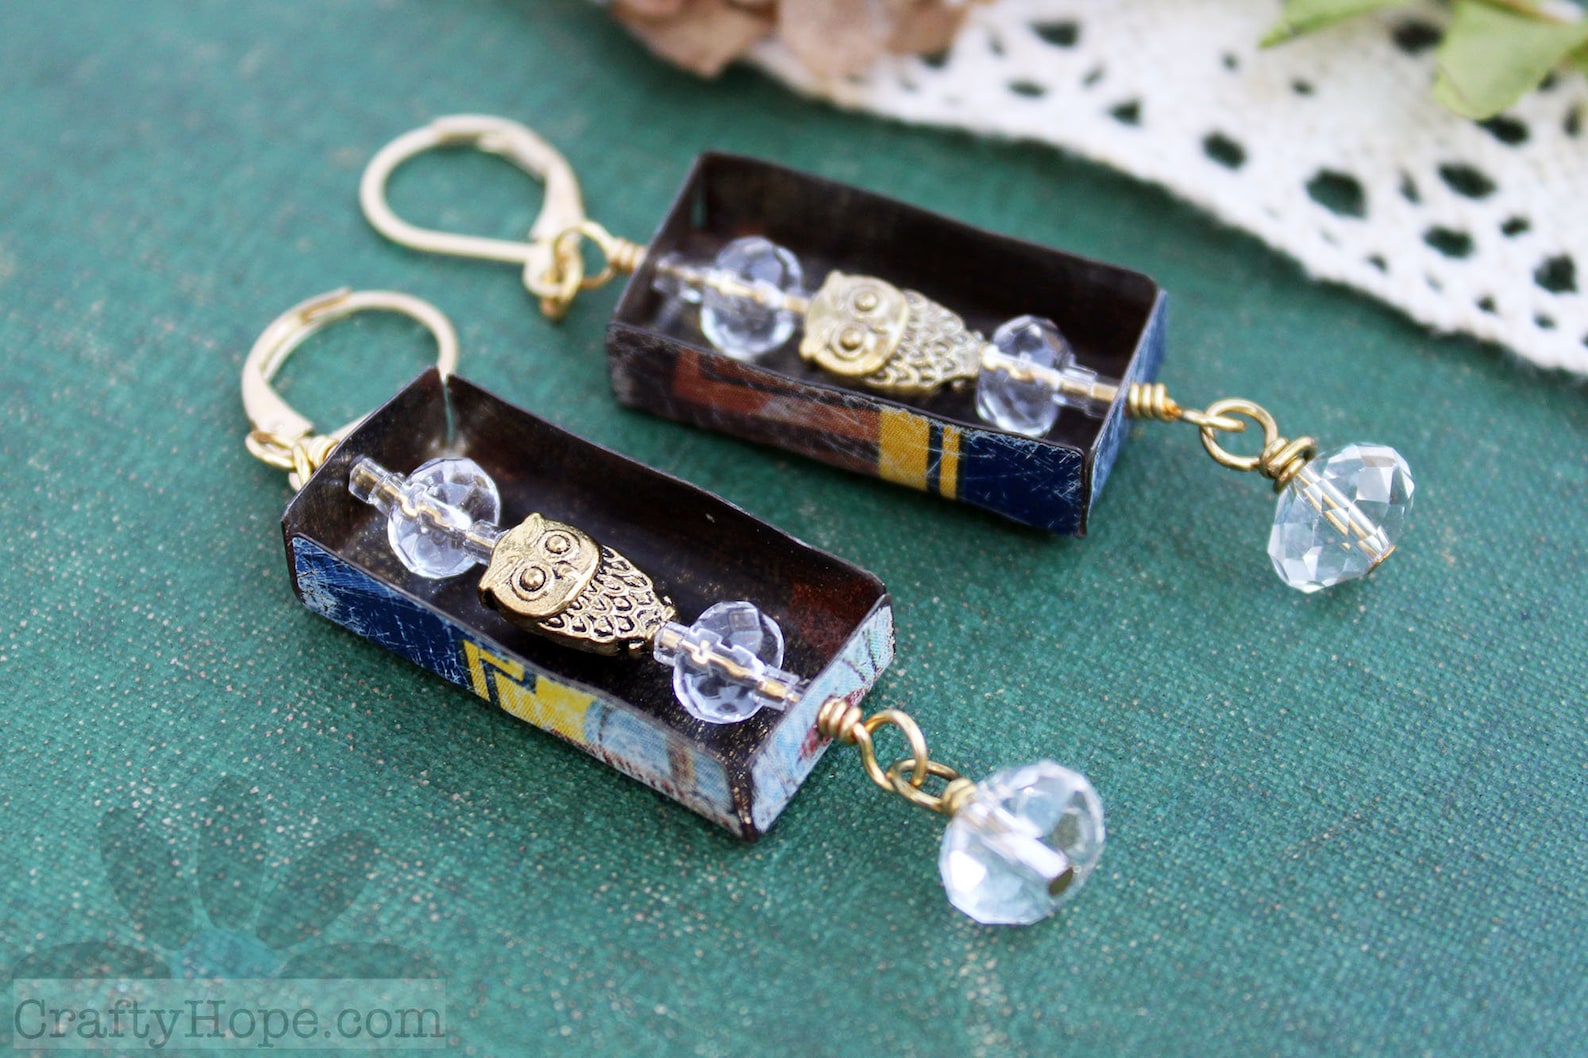
Maybe it's just me, but these Boxed Owl Earrings really tickle my fancy.

You got a look at this Floral Crest Necklace when I revealed it the other week. Don't forget that it's available for sale. 

I'm always a sucker for anything rainbow-y. This Rainbow Inspiration Bracelet not only has all seven colors but also inspiring found words. 

This Dark Assemblage Necklace brings together a snap ring from the hardware store, soldered found objects, beads, and a handmade resin piece. I really love it.

If the above necklace was too dark for you, these Night Sky Earrings have a pop of bright to them with the moon, stars, and loads of sparkly beads. 

Brand-spanking-new to the shop is this Upcycled Butterfly Necklace. The pendant is made from one part of a vintage watch spring tin. It's filled with paper, lace, rub-ons, and a butterfly image. 

As I mentioned, these are just a few of the treasures you'll find in the CraftyHope Etsy Shop.  And, as a bonus, I've got a 20% off coupon. Use code SUMMER20 at checkout and save on your purchase from my shop. (This coupon is only good through September 2nd.) So, go now and have a look!! Let me know which are your favorites.

Sale at My Jewelry Booth in Fairhope

In addition to the CraftyHope Etsy Shop here online, I also rent a small booth at a local antique mall. It's called Southern Antiques and Accents and is located in Fairhope, AL. Having the booth is perfect for local individuals who would prefer to shop my jewelry in a hands-on manner. I swap out the jewelry on display there seasonally so it doesn't get too tired-looking. And, it's almost time for that swap. So, I'm having a sale in the booth.

As the sign says in the picture above, everything in the booth is 20% off!

Unlike the Etsy shop, the booth is generally sorted by the elements included in each of the pieces. Each of the jewelry items on the above shelf contains at least one found object or salvaged material. 

This shelf is my upcycled tin shelf. I'm having a hard time keeping it under control as so much of my work lately has been in this medium. 

Then, there's the Mixed Media Jewelry shelf, which means that the pieces will consist of just about anything else. Oftentimes, it's just a mix of basic jewelry elements. 

At the very bottom, you'll find my sale shelf. The pieces on this shelf have already reduced prices. But, during this sale, you'll get an additional 20% off those. How about that!?

This sale will run through September 1st.
So, if you happen to find yourself in Fairhope, Alabama, make sure to head to Southern Antiques and Accents at 254 South Greeno Road to check out the sale. When you walk in the door, you'll see a line of bookcase-like shelves on the left. Mine is the last one. 

And, if you can't make it before the first, there's always Super Second Saturday on the 11th.
On that date, you'll get 10% off storewide (except the booths that are having their own sales) as well as find demos, a giveaway,  and lunch available. 

Have fun shopping!

Chain Link Earrings: Part 9

Earrings are probably the easiest jewelry pieces to make. All you have to do is add an ear wire to a charm, and BAM, you've made an earring. But, making something different and interesting is a little harder. In this ten-part jewelry-making series, I've been sharing a variety of ways to use the large links from metal chains in a pair of earrings. This is the ninth tutorial in this series. 


The tutorials have been getting progressively harder, but this one isn't probably any harder than the one before it. It is an alternative to the previous one, though. 

I'm personally drawn to anything involving the seven colors of the rainbow, so these get my attention! You could use any color combination you prefer to create these easy and cute earrings. 

The supplies and instructions are detailed in the Chain Link Earrings Part 9 video on YouTube. 

If you have any questions at all, please don't hesitate to let me know!

July Honey Do List Reveal

While I am abundantly aware that July has ended, I also know that Sarajo at SJ Designs Jewelry leaves the linky tool open for about a month after the reveal date for each of her challenges. The Honey Do List challenge is one that her husband, Eric, offers to her each month. He gives her a photo from which she can draw inspiration to create jewelry designs. And, she shares that photo on her blog for other jewelry artists to use also. I was a bit overwhelmed in July but knew that the photo was one that would lead me to a great design. And, I wasn't mistaken!


I really adore the necklace that I made from this inspiration photo. 


You see, the crest in the middle of the photo (among the leaves of the tree), called out to me. I decided to create a crest-shaped pendant from tin. And, I was determined to use a tin that had leaves on it.


In addition, I incorporated blacked steel wire that echos the wrought iron of the gate. I realized that this completed necklace doesn't scream of the original photo, but it's those little elements within the photo that pulled me to create this fabulous piece. 


I'll be adding this Floral Crest Necklace to the CraftyHope Etsy Shop today.

As always, thanks go out to Sarajo and Eric for the inspiration. Make sure to head over to the reveal of the Honey Do List to see what else was made from the photo. 

August Challenges and Inspirations

I feel like the only things I've accomplished lately have been driven by art challenges. And, I can't decide if that's good or bad. But, producing art is still producing art, so I'll keep diving into the challenges as long as I can find them! Here's what I've discovered for this month.


  • The August Art Elements Theme Challenge is Turtles. This challenge is open to any medium and you can submit your designs in the Art Elements Community on Facebook throughout the month.
  • Over on the Halcraft Collection, you can find their August Pretty Palette that is a pretty summery mix of colors that they're calling Cicada Symphony. You'll also find all the details about the jewelry challenge there too. 
  • Three days ago, a quick two-week challenge began that you can hop on into at any time. It's The Ugly Art Club's Five Minute Challenge that's happening over on Instagram. The challenge is to be creative for just five minutes each day, take a picture of what you created  (even if it's not done), and use the hashtag #tuac5minchallenge so we can all support and find each other. Most of the art being created is mixed media art journaling, but the hosts have made it clear that it can be any medium!
  • Also on Instagram is the Seek Gather Create Challenge from @LisaGoddardArt, @TinaHoisArt, @MixedMediaMagpie, and @LauraDennison. It's a mixed media scavenger hunt challenge in which each Sunday, the hosts share a list of four items for you to find and work into a piece of mixed media art. The second list was just announced, and you can find more examples of what artists have made with the hashtag #SeekGatherCreate. This is a weekly challenge. 
And, those are all the challenges I'm aware of at the moment. I will add to the list any new challenges I find, so check back to see what's been added (if any). Don't hesitate to let me know if you know of any I may have missed. 

Thrifty Thursday - July Thrifty Haul

As a treasure hunter of sorts, I've always got my eyes trained for the unexpected and special. And, what's more special than a good bargain? Each month, I like to share the steals and deals I found in the previous month. Let me tell you, this is a GOOD ONE! (I may have said that last month too, but I'm not teasing about either of them.) I found some fabulous items at a yard sale held by local artist friends. Take a look.

The husband was purging most of the supplies he had collected for his Steampunk artistry. I hate that I couldn't take more than I did. But here's a sample of what I did pick up.

And, here's the rest of it.

My July Thrifty Haul video gives you a better look at most of these pieces as well as a look at what I bought from the Dollar Tree on one trip.

And, that's really all the thrifty bits I picked up in July. I honestly did try to find more. But, it was a busy month with other commitments and activities so that thrifting wasn't at the forefront. 
Tell me, have you scored any great deals lately?

Art Journal Videos in July

I've already heard a couple of other people mention how fast July flew by, so I know that it wasn't just me that it whizzed past. Despite its speed, I was able to get many "art journal" videos posted throughout the month. Actually, not a single one of those videos took place inside a journal. Each of them is an index card for ICAD (Index Card a Day), but they include the same mixed media techniques I would use in a journal. Let's get to it. Here's a peek at each of the cards. Clicking them should take you to the videos of how I made them. 

ICAD 5

ICAD 6

ICAD 7

ICAD 8

ICAD 9

ICAD 10

ICAD 11

ICAD 12

ICAD 13

ICAD 15

ICAD 16

ICAD 17

ICAD 18

I should be posting these ICAD videos for a few months as I made 61 of them. Now, there are a few that didn't turn out well and will be skipped (like number 14 above), but there will be plenty of videos from me for a while. Make sure you're following the CraftyHope YouTube Channel and hit the bell icon to get notifications when I have new videos.

Which of the above is your favorite? I absolutely love ICAD 10!

Upcycling is Life (AE Theme Challenge)

When I saw that the Art Elements Theme Challenge for July was Upcycle, I knew I would have to post SOMETHING. Almost everything I create includes some kind of upcycling in it. I really could just make a long list of links and pictures and be done with it. But, it's more fun to share something new. So, before I get to a very short list of some of my previous upcycled projects, here's the "something new" I created. 

Before I go any further, let me explain what upcycling is. Here's the quick definition.

Basically, it's taking something old or intended for the trash and transforming it into something new or using it in a new way. This is the basis for most of the art I create day in and day out. So, I was almost intimidated by this being the theme for the challenge, because upcycled art is my everyday. Anyway...let's get back to that sweet little pendant I made. 

I began with a tiny round tin.


It's a tin for clock springs (I hauled in a TON of these at the beginning of the month and will have a thrifty haul to share next week.) This one had no counterpart and needed a new purpose. So, I started with it. 

After creating loops in the tin with headpins, I layered UV resin, paper, rub-ons, lace, and a paper butterfly (from a Tim Holtz Ephemera pack) in the recess of the little tin.


I layered and layered until I came up with something that made me happy.

If you're interested in learning more about the process I used, I will have a video reveal on the CraftyHope YouTube Channel on Saturday at noon (CST) that shows a very similar technique with a basic bezel. 

I'm really tickled with how well this pendant came together and can't wait to integrate it into a full necklace. As well, I have a massive stash of more of these tins now that will also be transformed in the future (yay!)

Now, I mentioned that I also upcycled loads of other things and would be remiss if I didn't share a few of them. First, almost everything in the CraftyHope Etsy shop includes some kind of upcycled item (almost).  Old cookie tins are one of my favorite items to upcycle into my jewelry.

These Boxed Owl Earrings are just one example of how I use the tin. 

Found objects are also often used in what I make.

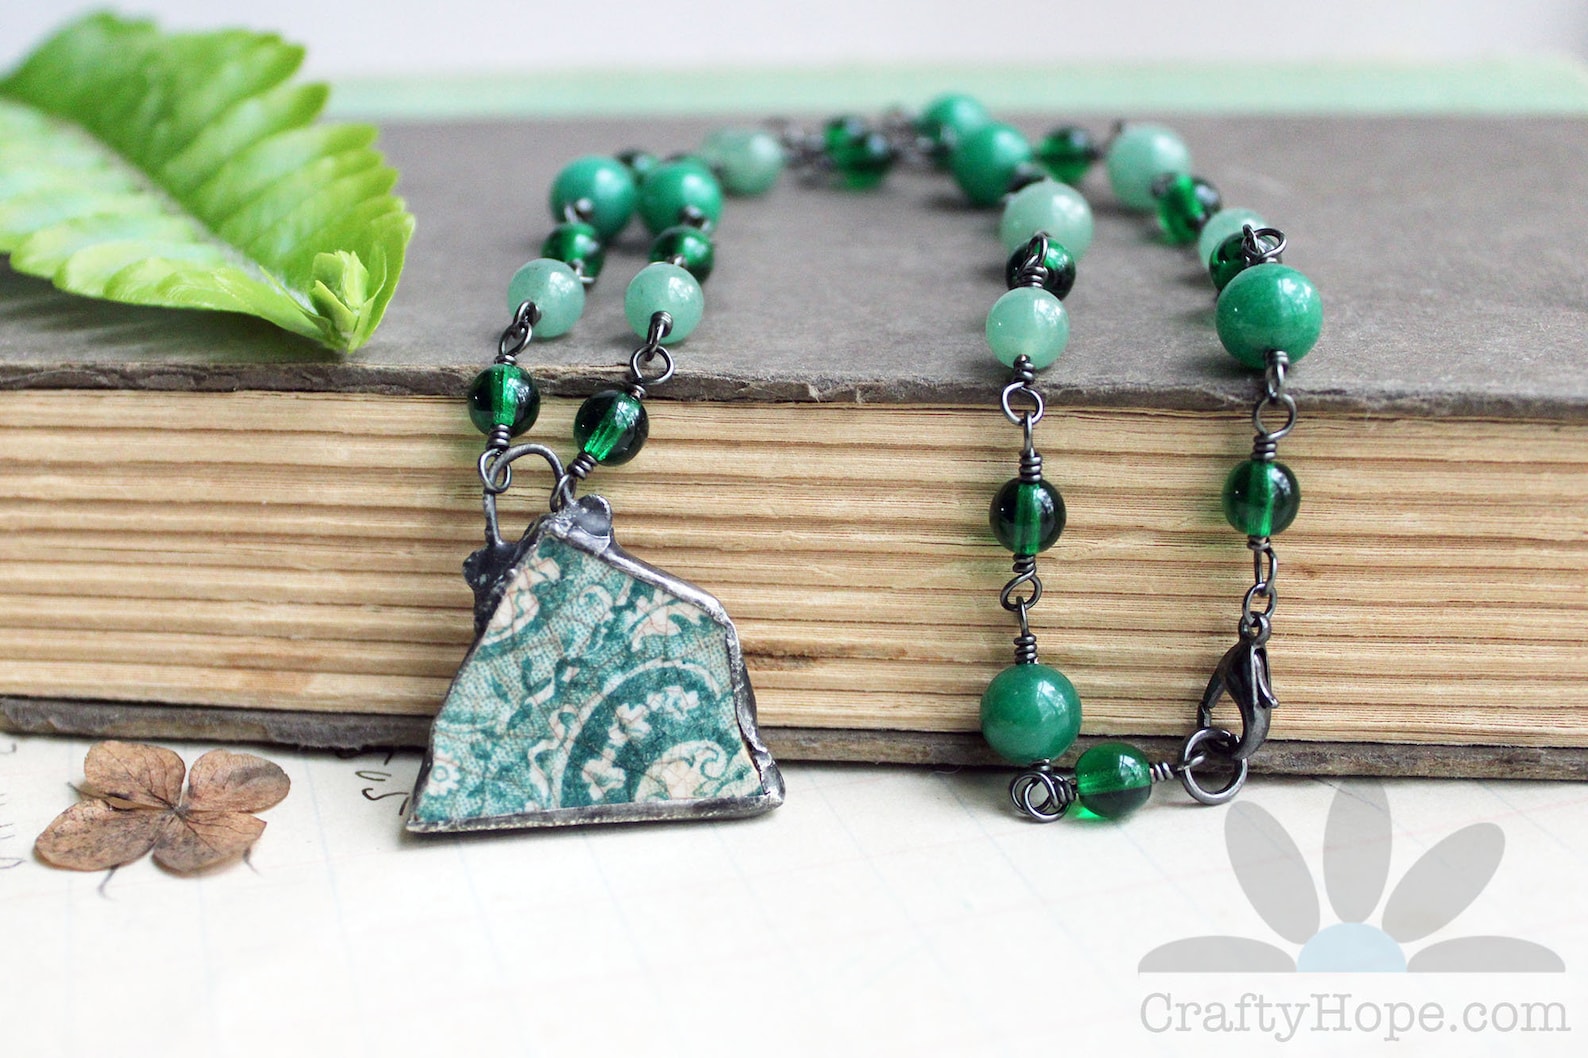
Admittedly, I did not personally find the ceramic shard that's the focal piece of this Green Pottery Necklace, but I did give it new life with the addition of some solder and beads. 

Recently, I took old leather belts from the thrift store and made them into cuff bracelets.

Eventually, I will add other elements to them for personality and interest like this one that had (more) tin riveted to it.

But, it's not all jewelry-making for me. The most-watched video on my YouTube channel is my DIY Junk Drawer Wind Chimes video in which I show how to use an old tin can, wire, and items from your junk drawer to make a "wind chime."

If you're interested in some of my other videos on upcycling, there's also a Mixed Media Fairy Nook that was created for the Art Elements Repurposing theme challenge in April 2019 as well as my DIY Assemblage Owl that I made as part of the February 2019 "Birds of Prey" theme. 

And, my mixed media paper projects almost always include the upcycling of various paper materials (old book pages, receipts, photos, etc.) I confess that I am an upcycling maniac! But, alas, I didn't get much more made new this month specifically for the challenge. So, I hope some of those other older projects will inspire you to take something old and make it into something new and amazing. I mean, otherwise, it's just going to take up space in a landfill. Don't let that happen! Make something beautiful instead. 

Make your own Alcohol Ink Sprays

You don't always need the fanciest and most expensive supplies to create art. Sometimes, you can make the materials yourself using more affordable products. This is the case with these alcohol ink sprays. They're both easy to make and inexpensive!

And, even if you can afford the more expensive and name-brand sprays, it can be fun to make and customize your own art supplies too!

Now, this idea was not my own, I learned it from someone else many years ago and have since lost track of who it was that had the bright idea to combine markers and alcohol. But, as I've been asked several times how my Alcohol Ink Sprays were made, I thought it best to just go ahead and share the process. It's so simple. 

I was able to find all the materials I needed for these sprays at the dollar store (Dollar Tree). 

While I've really only used them as sprays, they can work as inks as well.


You can just put them in bottles without a spray nozzle and splash them onto your page.


As always, I'm more than happy to answer any questions you have about this or any of my other crafts. Just comment here or over on the YouTube video! 

Thanks

NEW website (and blog to go with it)

 Hey y'all!! I've got some news. It's great, but also bittersweet. After almost NINETEEN years here on Blogger/Blogspot, I'v...