Showing posts with label vintage. Show all posts

DIY Enamel Flower Necklace

A few years ago, collecting and using vintage enamel flower brooches in a variety of ways was all the rage. At the height of it, I succumbed to the mania and collected quite a few of the floral pins myself without any real plan of how I would use them. I found that making a simple necklace from a single one was a great Spring project.

It all begins with selecting just the right enamel flower brooch.
For me, that meant one that was large enough to make a statement, had thin enough petals to punch through, and was pretty enough to be worn.

If you're okay with keeping it as a brooch, you can skip the next several steps. However, I feared that the pin back would come open while being worn as a necklace and prick the wearer. 
If you have the same trepidation, grab a large pair of chain-nose pliers. 

Use the pliers to pull off the pin mechanism. 
It could take some tugging, but it's usually quite simple. 

From there, use a metal hole punch to create a hole at the top of one of the petals. 
If you don't have a metal punch, you could also use a hammer and a nail to make your hole. 

Simply add a jump ring and a chain to complete the necklace.
Opening and closing a jump ring is as simple as a twist. Click the link to see my tutorial on it. 

With that, you have a beautiful necklace, perfect for Spring.
As a side note, if you're concerned about damaging vintage jewelry, there are plenty of reproduction flower brooches out there that came out when these floral pins were all the rage. 

I originally shared this Upcycled Enamel Flower Necklace tutorial on Cut Out + Keep. The complete materials list can be found there. But, if you have any questions, please ask away in the comments below!

Romantic Upcycled DIY Ornament (Giveaway)

This project was sparked by the Art Elements Christmas Ornament Design Challenge. Between the inspiring projects Lesley shared in her initial post and the list of inspiring DIY ornaments I found, I was definitely inspired to create something really spectacular. In fact, I'm pretty sure I combined several of those inspirations to make my own ornament.

I adore working with old, aged, vintage, yellowed, shabby items. One of my favorite pastimes is looking for treasures to incorporate into my work. There's something about these bits and knowing they have their own history that makes me smile. Exploring other ways to use them outside of jewelry is fun too. This project gave me the opportunity to pull out a great many of my hoarded treasures and combine them into a beautiful Christmas Ornament.

It took me almost no time at all to make this ornament, so let me show you how you can too. This is a blog hop, so if you just want to hop on to see the next ornament, please scroll to the bottom of this post! 
Start with these tools and materials:
Wooden Spool
Chandelier Crystal
Fiber (lace, sari silk ribbon, rick-rack, etc.)
Buttons (2)
Wire
Sheet music (or other interesting paper)
Paintbrush
Mod Podge
Scissors
Jewelry Pliers (wire cutters, round-nose pliers, chain-nose pliers)

Cut your paper down to size so it fits inside the indent of the spool. 

Using Mod Podge or another medium (school glue, gel medium, etc.),  glue down and seal your paper on the spool.

Cut about a foot of wire and form a loop (with your round-nose pliers) in the center of the wire.

Slip the chandelier crystal onto the wire, making sure it slides into the loop.

Twist the wire several times to secure the crystal into place.

Cut your fibers and match up their centers with the twist in the wire.

Hold the fibers into the nook of the wire so that the lace is nestled between the two pieces. Squeeze the fibers as tight as possible together and twist the wire so that the fibers will stay in place.

Slide a button onto the wire, making sure that you insert each wire end into a different hole.

Slide spool onto both wires.

Thread another button onto the wire.

Twist the wire together for a couple of inches.

Trim the wire just below where the twist ends and fold over the sharp end, pressing it against the other wire.

Curve the twisted wire on the large portion of your round-nose pliers to make a hook for hanging. You could alternatively make a closed loop and insert a ribbon or ornament hanger.

And, that's it. Your ornament is ready to hang on your Christmas tree or really anywhere.

I made a video of my process to make this romantic ornament in case these instructions just don't do it for you.

Here are a few more pictures of the ornament (please note that I actually made two different ornaments - one in the video, and one for the step-by-step pictures. The video one is the one I used for the first picture and pictures to follow.)

Now, this ornament is part of a blog hop, so here's the list of the other participants in the Art Elements Christmas Ornament Design Challenge. Go see what all these other talented designers made. I know I'm looking forward to it.

 Would you keep this baby tucked away especially for Christmas or would you have it out on display all the time? I'll let you decide. If you're interested, I'll give away one of these ornaments. Let me know in the comments and leave your e-mail. Alas, this is only open to US residents. I'll pull a winner on January 5th.

I sincerely hope your Holidays are magical; full of joy, love, and fun.

I've linked this post up at Saturday Sparks Link Party on Pieced Pastimes, Show and Share link Party at Coastal CharmDIY Salvaged Junk Projects and Funky Junk Interiors, and Recipe and DIY Linky at The Sway.

Friday Finds #6 | Thrift Store Scores

Last week I got a little restless so I knew I needed to venture out and hit up some thrift stores and antique malls. Sometimes I feel like I get those urges because there's something out there that's calling my name and beckoning to me to come get it. Yes, I have an over-active imagination but just check out my finds.


I'll admit that I only found these treasures at half of the places I visited. But, who doesn't love the thrill of the hunt?
As soon as I walked into the first place, I noticed that they had a display of office supplies. This rolodex caught my attention since it was full of blank rolodex cards. 
The Facebook group I do most of my swaps with often does altered rolodex card swaps, but that was a supply I didn't have on hand. I think I'm well-supplied now!
Over in the book section I spied the edge of this old music book.
The frayed edges and twine tie piqued my interest.
I was sold when I saw the fountain penned name and date on the inside cover.
And the music pages are beautifully aged too. (This picture's not the best. Sorry about that.)
As a bonus, this Beethoven music book was also tucked between some of the pages. Score!
I also spotted the edge of this French book.
There's hardly any English words in the book, but lots of images and French phrases on wonderfully yellowed pages.
Awesome, right?

My time at that thrift store yielded no more finds so I moved on to a few more places. My last stop of the afternoon was an antique mall where I spent almost an hour. In the same booth I had found the keys a few months ago was this broken compass.
It's missing its hand, but that's not necessary for my needs.
The front has US engraved on it and some wonderful splotchy patina. I'm not sure if it's military or someone's initials or a brand. But, it's pretty darn cool.

I also picked up this jar of handmade sweet pepper jelly. 
I just can't resist pepper jelly. It's so good on crackers and cheese.

The biggest steal of the day was this turquoise starburst Pyrex dish.
The lid has a chip out of it, which was hard to photograph.
But, it's real and true Pyrex. 
The few searches I've done for this pattern have shown that the cheapest one for sale was about $50 more than I paid. A steal!

It wasn't a huge haul, but it got me out of the house for the afternoon and I was able to silence those pieces that had been calling my name.

What have you found of late?

More Go-To Jewelry in the CraftyHope Etsy Shop

Yesterday I showed you my go-to jewelry pieces. However, those are just the ones I keep in my personal collection. My favorites to grab are from the CraftyHope Etsy Shop. Here's a few of the ones I gravitate toward most often.

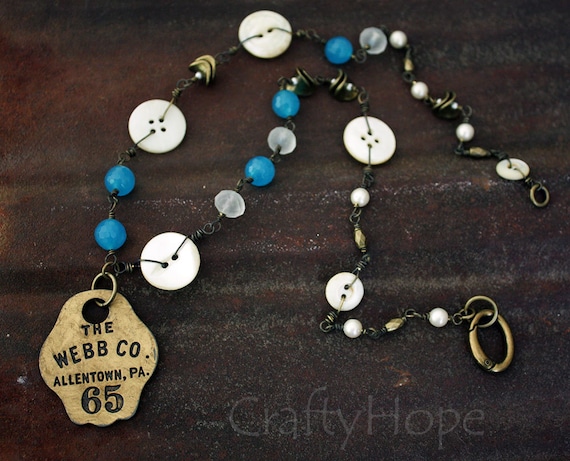
I'm drawn to the Webb Tag Necklace because it consists of mother of pearl buttons, bright blue stone beads, and that awesome vintage tag. Yum! It's a longer necklace and is great for adding a little something to a plain shirt.

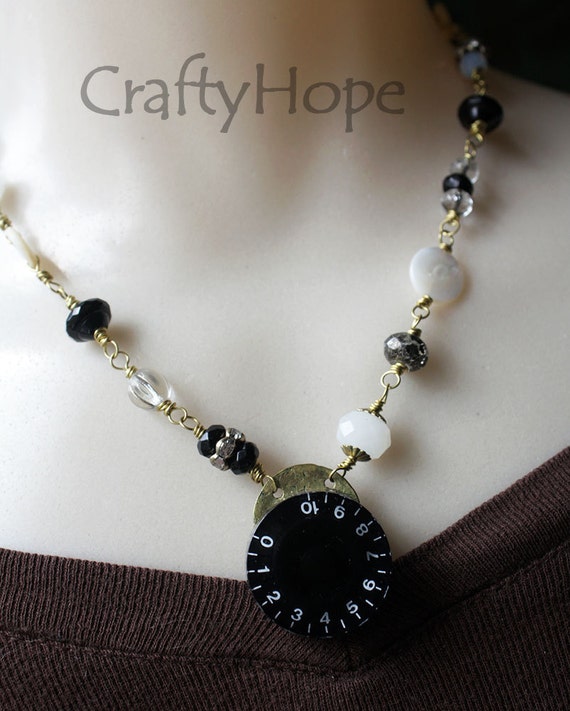
The Pump Up the Volume Necklace has a guitar knob as the focal. How cool is that? It's a shorter necklace than I usually make or wear and is perfect for when I'm wearing a top with a lower neckline. The simple palette of black, white, and brassy gold-tone helps it match just about anything. And, the faceted beads and rhinestone spacers help dress up something that may be a little more casual.

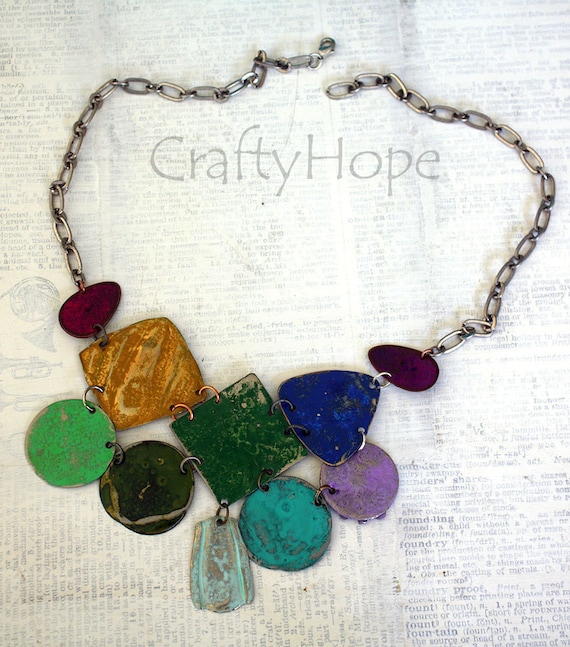
Oh, how I love this Smashed Rainbow Necklace! The components are made from old jewelry pieces from the thrift store. Some of them were puffed metal earrings from the 80's that I smashed flat (hence the name). I colored the pieces with Vintaj Patina, laid them out in a rainbow pattern, and punched holes so they would lay out in that pattern. I wore this necklace not too long ago with a basic black dress, and it made just the statement I wanted - adding color and interest to a plain outfit.

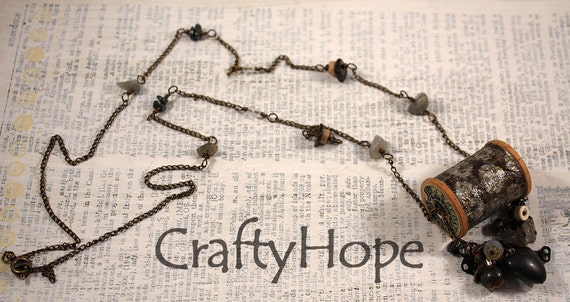
My Crackle Spool Necklace is a for sure favorite. I made it as part of a jewelry challenge to incorporate a spool into a piece. With paints and crackle, I altered some paper and sealed that into the center of the spool. Thin chain was inserted into the hole of the spool to make up the chain of the necklace as well as a base for an array of charms. You can see more detail about the piece in its description (click the link above).

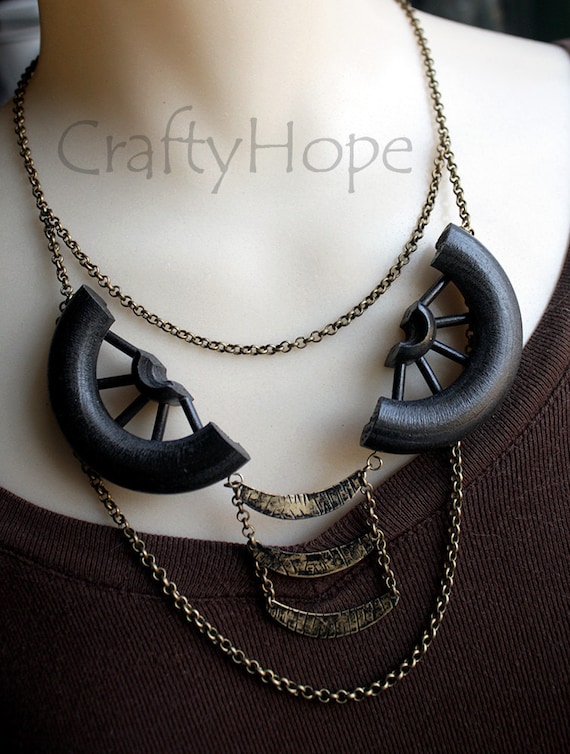
Like the spool necklace, this Altered Wooden Wheel Necklace was the result of a challenge. Each participant was sent a wooden spool to work into a jewelry piece somehow. I asked Pat to cut it in two and drill some holes. From there the halves were painted, chain was added, and brass blanks were altered and hung. It is a serious statement piece and unlike anything you will see anyone else wearing. I love it for that alone.

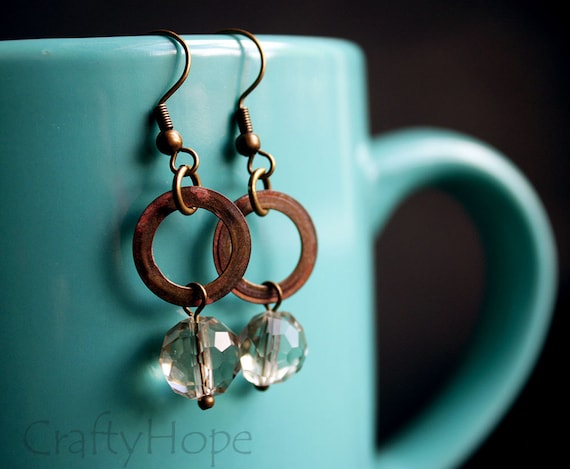
These Folder Ring Earrings have been worn a time or two as well. The 'folder rings' were indeed rescued from old folders that came in a desk we bought. I aged the rings with a vinegar-salt solution and sealed them. The faceted glass beads have a tiny bit of a smokey color and accent the rings perfectly. I adore the simplicity of these earrings that could be worn everyday.

I know, I know, all but one of these are necklaces, but that's just how I roll. However, I do have some awesome handmade earrings and bracelets in the shop too. Unfortunately, I just can't wear everything I make. I have to save something for you to enjoy also. What pieces in my shop would you wear most often?

Friday Finds #2

I hope my American friends had a wonderful Thanksgiving. I hope everyone all over has had a great week. It's officially the start of the holiday season! I took some time today to retrieve our Christmas decorations and set a few out around the house. Now, to get and decorate a tree for the first time in many, many years.

Anyway, I'm popping in to share some more Friday Finds. If you didn't see my first Friday Finds post last week, let me clue you in on what I'm doing. I want to share some of the coolness I find in thrift stores, on my property, or wherever.

This time around I simply want to share some of the beauty and awesomeness I found while Pat and I hiked our own property last weekend.
This pink camellia bud spurred the whole hike. I spotted it and wanted to explore. So, explore we did!

Just inside the woods, I spied an old downed log, or tree stump, or some other kind of wood with a beautiful green mossy cover.

On the other side of the log, stump, wood thing was this large critter hole. In fact, we found holes like this all over the property. We've got a serious armadillo problem I think.

Just past the hole was this gorgeous oak tree, with a little magnolia on the side. I've admired it from the yard, but it's even more beautiful up close.

On the way to the other side of the property, we stopped to poke out heads into one of the sheds. Way at the back was this scale on a shelf. I LOVE IT! I had Pat grab it for me, and I drug it over to the barn to clean up later.

As we hiked and explored and checked out old trails at the back of the property, I looked down to see this delicate skeleton leaf. I scooped it up and carefully carried the fragile foliage through the woods as we finished up our adventure.

Before we left the woods, I quickly snapped a picture of the beautiful day we had been blessed with so I could share it with you wherever you are.

What have you discovered lately in your own back yard?

NEW website (and blog to go with it)

 Hey y'all!! I've got some news. It's great, but also bittersweet. After almost NINETEEN years here on Blogger/Blogspot, I'v...